With the recent rise in popularity of web technologies such as Flash and AJAX, it has become possible to create richer user experiences on the web. Even though these technologies are not actually new, we are now seeing their widespread adoption. Within the last six months, we have seen the christening of the term “AJAX” and its broad acceptance. Most major websites are adding rich interaction to their existing features.
What has changed?
The traditional paged Internet application (PIA—part of what is sometimes referred to as Web 1.0 or classic web) has these characteristics:
- The user enters information at the page level or clicks on a link to go to another page.
- The page refreshes to show the result of the user's request.
- Everything is framed in the context of a document content model.
A rich Internet application (RIA—part of what is now called Web 2.0) behaves like this:
- The user interacts directly with items within the page and the feedback is immediate.
- The page does not have to refresh to complete the user's interaction (data flows seamlessly in the background, allowing for instant feedback).
- The interface can be thought of as an application model containing interface objects.
Moving from designing primarily for PIAs to RIAs presents us with a specific challenge: how do we document these richer interactions?
Wireframes
Wireframes capture the structure and relevance of information for a given screen or page. Wireframes and PIAs are a match made in heaven. Each wireframe corresponds directly to a page. The interactions typically move from wireframe to wireframe (page to page), making the interaction model simple to understand.
In the world of RIAs, wireframes are still a very powerful tool. Information still must be structured and its relative importance must be presented. However, with the deepening of the interaction dimension, it becomes more challenging to illustrate to clients, developers, and users how the intended interface will behave. This is due in part to the wireframe's static nature. It also becomes more challenging to test early designs with users since wireframes do not naturally simulate the more complex interactions of an RIA.
Enter Visio
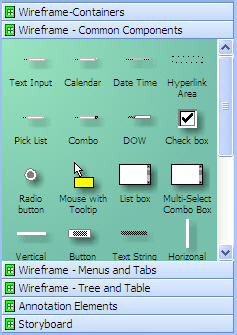
At my previous company, Sabre, I led the user experience team for Airline Solutions. I built Visio stencil libraries that contained shapes simulating all of our web and desktop components (see figure 1). This simplified the creation of wireframes. The stencil libraries incorporated things like:
- Intelligent layout using Visio connectors (Lego-like snapping)
- Simulation of component states with right-click menus (select/deselect checkbox; show/hide borders)
- User interface code-generation for both JSP (Java Server Pages, web) and Java Swing (desktop)
- Requirements generation
However, one thing was lacking—the ability to simulate rich in-page interactions. I addressed this by creating a new stencil library that could simulate user interactions within a page. I used a storyboard metaphor for the stencil library (see figure 2).
Storyboards
Storyboards were originally conceived at Disney Studios about seventy years ago. They are a sequential series of illustrations or rough sketches, sometimes including captions of events. Storyboards provide a synopsis for a proposed story (or a complex scene) involving its action and characters (see “storyboard” at http://filmsite.org/filmterms18.html ).
Storyboards transfer well into the world of the user interface. With a storyboard we can present as frames each step in a sequence of user interactions. Viewing the interaction in a story format helps to refine the interaction and provide feedback for user testing.
The Visio storyboard stencil library
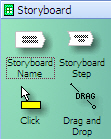
The storyboard stencil library contains four basic tools:
- Storyboard Name. Describes the storyboard scenario and is used to reset the interaction animation.
- Storyboard Step. Describes a step in the animation and shows or hides interface elements as needed.
- Click. Used to document the user interaction with the mouse.
- Drag & Drop. Used to document a drag and drop interaction.
Underpinning the Storyboard library is the layer feature in Visio. Layers can contain shapes and be shown or hidden. Showing a layer causes all of the shapes that are within the layer to be made visible. Hiding a layer hides the shapes it contains; however, if the shapes are part of another layer that is visible, they will still appear. Any number of layers can be created on a page, and shapes may be associated with a single layer or with multiple layers.
The storyboard stencil library provides a way to associate a storyboard frame (or step) with a given set of layers that can be turned on or off. In this manner we can create a crude animation (much like a children's flip-book) that walks through the steps of an interaction.
The purpose of the storyboard stencil is to simplify animating the interaction steps with Visio layers.
Example: inline editing
So let’s imagine we have a photo sharing site and we would like to like to be able to edit the title of a photo directly (inline content editing an RIA concept) without having to go to a different page for editing the title (separate page editing a PIA concept.)
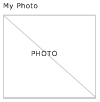
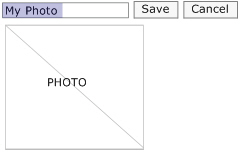
See figure 3 for the wireframe for this simple page. It consists of a title and a photo.
What we would like to simulate in our storyboard are the following interactions:
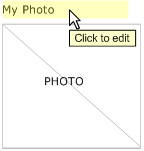
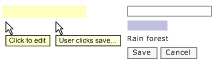
- Show that the title can be edited. Hovering over the title uses highlighting to indicate that the title is editable.
Start editing the title:
a. Clicking in the title allows direct editing of the text string “My Photo”. The text is surrounded by a rectangle, indicating the field is editable. Save and Cancel buttons are displayed next to the field.
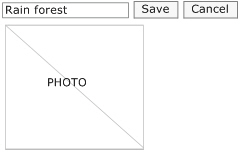
b. The entire text of the title is selected. - Type in a new title. New text will replace the selected text “My Photo” with the new text “Rain Forest”
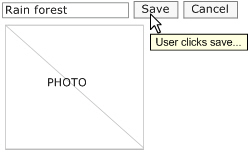
- Save the title. Hitting the Save button saves the title.
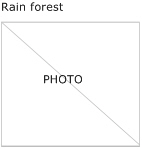
- Show the new title as no longer editable, but a simple part of the page content. The Save, Cancel. and text edit rectangle disappear on a successful edit. The new title appears as part of the normal content of the page.
See figures 4-8 for how this looks, frame by frame.
Notice that a number of additional shapes appear and disappear during the sequence of interactions. These are the additional interface elements that are needed to simulate the user interaction. In this example, we need eight shapes:
- Highlight
- Tool tip with cursor
- Text edit rectangle
- Text selection rectangle
- Save button
- Cancel button
- ‘Rain forest’ text
- Mouse click for the save button
See figure 9.
In order for us to hide and show interaction shapes as needed, we have to associate them with layers that we can turn on and off at each interaction step. It is important to remember that the layers in Visio—not the individual shapes—are what get hidden or shown.
You might be tempted to think that if you have five interaction steps then you will always have five layers to manage. But that really depends on how fine-grained the interaction will be. Since an interaction step can turn on or off one or more layers, there is not always a one-to-one correspondence between the number of steps and the number of layers.
In our example, we need to show the text as selected in step 2b but remove the selection during step 3. This requires us to control the selection individually. To do this, we create a layer that only contains the selection—allowing us to control its visibility in turn.
OK, so here are the five layers we need to control the individual shapes:
- showTitleIsEditable. Contains the highlight and the tool tip.
- startEditing. Contains the text edit rectangle, Save, and Cancel buttons.
- selectEdit. Contains text selection rectangle.
- changeTitle. Contains the new title text.
- saveTitle. Contains the mouse click for the Save button.
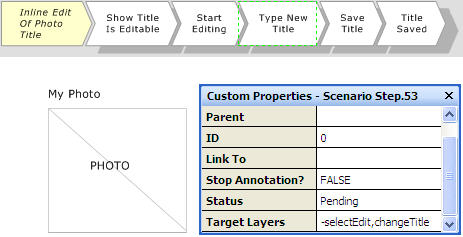
The five interaction steps described earlier are modeled with five storyboard steps. The storyboard name will reset the animation. Each storyboard step will hide and show layers to simulate the user interaction. See figure 10.

In order to drive the animation, we need to configure the storyboard name and each of the storyboard steps to control the hiding and showing of the correct layers.
What we need now is a way to tell the storyboard name and each storyboard step which layer or layers they will control. Fortunately, Visio provides a feature called custom properties that allows us to provide this additional information. Custom properties are a way to associate named data with a Visio shape. The storyboard name and storyboard steps come packaged with a custom property named Target Layers. The storyboard name’s Target Layers property will control which layers get turned on or off when resetting the storyboard animation. Each step’s Target Layers property will control what gets turned on or off at that particular step in the interaction.
Valid values for this property can be:
• The name of a single layer
The layer will be made visible when the step is activated.
• The name of a single layer preceded by the minus (‘−’) character
The layer will be hidden when the step is activated
• A comma separated list of layers (each of which may optionally be preceded with a minus character)
Multiple layers will be hidden or shown. If the minus character precedes a layer it will be hidden. Otherwise it will be shown.
Double-clicking the storyboard name willThe storyboard animation is reset by double-clicking the Storyboard Name.
So for our example, let’s see how the Storyboard Name and the five Storyboard Steps have their Target Layers property configured.
Storyboard Name – Inline Edit of Photo Title
-showTitleIsEditable, -startEditing, -selectEdit, -changeTitle, -saveTitle
All interaction layers are hidden to start with (acts like a reset).
Step 1 – Show Title is Editable
showTitleIsEditable
The layer showTitleIsEditable is turned on. This shows the highlight and the tool tip instruction.
Step 2 – Start Editing
-showTitleIsEditable,startEditing,selectEdit
We get rid of the highlight and tool tip and show the text edit rectangle, Save button, Cancel button, and the text selection rectangle.
Step 3 – Type New Title
-selectEdit,changeTitle
We get rid of the selection for the old title and show the new title text
Step 4 – Save Title
saveTitle
We show the mouse pointer and hint that the user will be clicking the Save button to save the title
Step 5 – Title Saved
-saveTitle,-startEditing
We turn off the save the title hint as well as all of the editing affordances.
To view custom properties, make sure the View:Custom Properties Window menu option has been turned on. See figure 11.
Stepping Through a Storyboard
To review we have
• Five storyboard steps
• Each step configured to hide/show individual layers
• The correct user interface shapes mapped to each layer
We can now use the storyboard name and storyboard steps to simulate a user editing the photo title inline.
Double-clicking the storyboard name will reset the interaction. See figure 3.
To step through the inline edit interaction, double-click each storyboard step in sequence. See figures 4-8.
While this example is fairly trivial, more complex interactions can be built. In addition multiple storyboards can be used to represent different use cases. This is important for showing error conditions as well as different edge-cases.
Managing Layers in Visio
In the interest of getting you into storyboarding as early as possible in this article, I skipped some very important details on how to manage and manipulate layers directly in Visio. Let’s look at how to manage Visio layers.
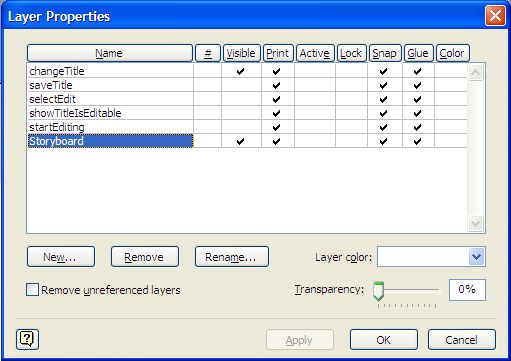
Layers are managed using the View:Layer Properties menu command. The Layer Properties Window that pops up allows you to add, delete, rename and manage the visibility of layers. Note that without the Storyboard stencil library you would have to use this window to turn layers on and off for each step. Obviously this would make animating an interface very tedious as well as distracting because you would have to set each one yourself.
While you will not normally use the Layer Properties Window to manage layer visibility (this is handled by the storyboard steps), this will be the way that you create, delete and rename your layers.
In the in-line editing example, you would create each of the five layers by clicking the New button for each layer and naming them individually. See figure 12 for what the Layer Properties window should look like after adding these five layers. (Storyboard is automatically created and used by the stencil library.)
The other important thing you need to know is how to associate shapes with a Visio layer. Select the shape or shapes you want to add into a layer. Then right click and from the popup context menu choose the Format:Layer command. This will allow you to add the shapes to a specific layer or to multiple layers. See figure 13.

Two important toolbar shortcuts
Since the View:Layer Properties and the Format:Layer tools are used constantly when animating an interface, a good shortcut is to add both of these commands to one of the Visio toolbars.
Let’s add the View:Layer Properties command to a Visio toolbar. You can do this by selecting the Tools:Customize menu command and selecting the Commands Tab from the Customize dialog that pops up. You can find the Layer Properties command under the View category. Drag this command to the toolbar − any spot will do.
Now let’s add the Format:Layer tool to a Visio toolbar − the best place is beside the Layer Properties tool you just added. The Format:Layer tool is under the Format Shape category; there are two different Layer tools listed, so pick the one that has a drop-down box beside it. Drag this command to your toolbar.
Now you have one-click access for adding layers (View:Layer tool) and changing the layer with which a shape or shapes is associated (Format:Layer tool). See figure 14.
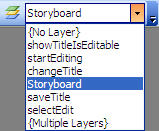
Now that the Format:Layer tool is located on the toolbar, you will find that the drop-down list of layers provides a nice way for viewing on which layer a currently selected shape resides. In addition, by selecting a new layer from the drop-down list, it will change the selected shape’s associated layer.
Installation
First, you will need to have Microsoft Visio 2003 installed on your machine. Second, you will need to download the install_storyboard.zip file. Third, unzip this into your My DocumentsMy Shapes folder. (My Shapes should have been created by Visio when you installed it.) Now that it is installed, you can navigate to this directory and double-click inlineEditWireframeExample.vsd to experiment with the photo editing example or you can start your own wireframe by double-clicking the Wireframe.vst file.
Summary
These tools provide a way to extend a common wireframe design tool, Visio, to support a technique for storyboarding wireframes. The storyboard metaphor is a simple concept to grasp. As we demonstrated designs to our Product Marketing teams at Sabre we received complimentary remarks about how much easier it was to understand interactions documented with storyboards; this made it simple to spot issues very early in the design phases.
A nice touch is to walk through the storyboard scenarios recording the animation with a video capture tool. The video can then be distributed to other groups and customers for early feedback on the interaction design with no instructions needed for walking through scenarios.
At Sabre, we were able to demonstrate for an important customer very complex application interfaces simulating in-page process flows, drag and drop, and rich data interaction. The interface we demonstrated had actually gone through several rewrites in previous years with less than satisfactory results.
Using the Visio storyboarding techniques outlined here we were able to present three iterations of the interface in a span of a few weeks. The final walkthrough was a success, with the client very happy with the new proposed interface. Additionally, their comments were extremely positive about being able to see and participate in the design at the earliest phases.
![]()
Hopefully this is the tip of the iceberg for rich internet documentation pieces in Boxes and Arrows. We have been dealing with Flash for six years as a major rich interface component (that was Flash 3 or 4 in 1999 that really tipped things). We now have AJAX and very little has changed on the documentation front. Nearly every IA or UX designer conversation the past 12 to 18 months has included a question about documenting rich interfaces.
Now there is one article to point that I feel is worth reading and sharing. It is long past time.
Looks like a couple of the original comments got lost since the posting of this article. In those comments some good points were made about other tools like Fireworks, etc. In those comments, I mention some background information.
I discuss the full Visio toolkit on my blog at:
http://looksgoodworkswell.blogspot.com/2005/11/visio-wireframe-toolkit-for-download.html
I also discuss briefly using Photoshop CS2 with animation & layered comps at:
http://looksgoodworkswell.blogspot.com/2005/11/animating-interactions-with-photoshop.html
The time is ripe for a tool to be created that allows us to take our design artifacts and essentially animate them into life. Being able to express designs as storyboards that can be animated or shown as storyboard “walls” would be awesome in a design tool. Being able to reverse engineer sites & interactions into storyboards would be a great way to share ideas.
Hi Bill
I’m Lars Pind, the guy responsible for the code behind this site.
Yes, there were indeed 4 comments that were lost in the transition. They’ve been brought back now, and they appear at the top, like they should’ve from the start.
Sorry about that, and thanks for letting us know 🙂
Great Article and very relevant to practical use.
I would like to add that the change from PIA to RIA doesn’t just mean direct manipulation of page elements but a change in what is destination for the user.
Previous destination was like navigating through listing pages to reach a product detail page and then configure the product, go to shopping cart and so on. With RIA the sense of destination is changed and then users manipulate that destination space. So they do not “move across spaces” but they manipulate objects in same space.
I belive the we are in transition phase rightnow and are merging current interaction mechanism with what RIA offfers, as we move forward we’ll see fundamental interaction and navigation mechanisms changing.
I am writing an article (hopefuly soon) about this on my blog (http://www.iprincipia.com) in more detail.
Cheers
Alok Jain
Very interesting article and usefull tool. But I’m wondering how to run the slide show according to there layers. Double click the name of layer?
Cheers, David
Hi Bill, I like the idea, but I prefer to show a client the wireframes in Full Screen view. Is there a way to go through the storyboard by just clicking (single) on the storyboard steps (like hyperlinks) in Full Screen view mode?
Cheers, Geert
David
Yes, you need to double-click on each of the storyboard steps (name or scenario step). The reason for this is Visio allows you to associate a macro with a double-click event. A hyperlink links to a page, anchor, etc.
I wired the storyboard stencils to use the double-click event.
While this example is fairly trivial, more complex interactions can be built. In addition multiple storyboards can be used to represent different use cases. This is important for showing error conditions as well as different edge-cases.
Why not just a visio uml diagram to illustrate the different use cases? What’s the advantage?
>>”While this example is fairly trivial, more complex interactions can be built. In addition multiple storyboards can be used to represent different use cases. This is important for showing error conditions as well as different edge-cases.” >>
Why not just a visio uml diagram to illustrate the different use cases? What’s the advantage?
I really enjoyed the opening explination of PIAs and RIAs – very useful stuff. I am also a great believer in wireframes and for that matter any kind of visually orientated process. However coming from years of in the trenches services time I think I would think twice at even suggesting this process due to the work load increase it would demand.
Really I believe the future of elaboration is in specifically designed specification and simulation tools rather than technical drawing tools such as Viso, Illustrator and the like. These new tools hold the promise of natively supporting good design patterns and automations to reduce workload.
The big issue really is – what are good design patterns for RIAs? An article on this i’m sure would garner great interest 🙂
Patrick, I think you are right that there can be an increase in workload with an approach that uses extensive wireframing. On the other hand, it saves you re-work later on and increases the chance that clients will be happy with the end result.
In terms of tools, I suggest people check out http://www.swipr.com. I had a look at this at the IA Summit and it looks good – it will also be free.
Roland
I’m not a Visio kind of guy either. But I’m extremely fond of Axure RP Pro. V4 is out and it lets you do all kind of dhtml-tricks to simulate AJAX stuff. And it’s so much faster than Visio or html’ing it all up in Dreamweaver.
Hi, I am new to storyboarding. I am currently working on a project that requires me to do some visioning and storyboarding. But I have no clue as to what I should be using. I have been researching some on the web and found this forum’s discussions about storyboarding useful and informational. I have Visio 2002, but the wireframes available here are for Visio 2003. I was initially thinking of just doing free-hand rough storyboarding, but if there is any software I can use that can make it look more professional and better, I am interested in exploring it. Suggestions and comments welcomed. Thanks!
Kudos to Bill Scott;
I really appreciate your contribution of the storyboarding article ( and code, never mind 🙂 )
I’m currently working on a quite broad and complicated Desktop application and the storyboard helped me stay focused and saved me a lot of time.
(I did have somewhat of a hard time starting to use it since its nowhere mentioned in this article that you’d have to also attach the VBA code to your Visio diagram, and it took me a while to reverse engineer it, so I think someone should please add a step by step instruction of how to extract it from the sample diagram and how to add it to a new diagram [maybe I’ll do it at a later time])
But here is my question:
I’ve uploaded my Visio diagram to my extranet so my client can see (& comment) my accomplishments using Visio 2003 viewer but unfortunately the storyboard macros do not change the layers when viewing with the viewer.
Does anyone know if its possible to make it work? Or is there a freeware type of viewer I can tell my customer to use?
Darshan, you may want to check out stpBA Storyboarding at http://www.stpsoft.co.uk/story.
The tool is based on Visio and supports versions 2002 and 2003.
The tool lets you capture and validate requirements through GUI storyboarding, and then generates screen flows, UI specs and test scripts.
Thank you Sam for your feedback.
Great article! I have been looking for a way to make utilizing storyboarding type interactive diagrams in Visio easier. At times I found it just as easy to do motion tests in Flash. It would be good if there were more options for outputing in Visio.
Excellent article! The great thing about Visio is that it is easy to try different layouts and alternatives. If you use templates and stencils, Visio is quite fast. Once you get into code, I find that you are locked in to some degree.
One problem is handing off Viso wires to designers who work in Flash or create HTML page templates. You can save a Visio as an SVG which can be opened in Illustrator. But if you were to draw the wires in Illustrator or Freehand, you could not only create equally effective storyboards, but designers could use these wires as starting points. The drawback is that these drawing files are not as portable or easy to use.
At the moment, I still think Visio is the best wireframing and storyboarding tool and Bill’s article seems to fill the gap on depicting RIA behaviors.
Is anyone using Illustrator or Freehand to create wireframes and storyboards?
HI everybody, great conversation, but I’m surprised that I haven’t heard a mention of newer tools like FlexBuilder, which can get your designs into action pretty dern quick, which is what you really want. Change it? No problemo – I say at 60% certainty, so like more input on that.
Of course, working in this IDE may require some collaboration with a semi-actionscript god, but if you have that luxury, or can even learn just a little of it, you can work very fast – at least that’s my initial go at this. I’d love to hear from long time users for using Flex for prototyping.
Personally, I’d rather learn a little ActionScript than more ways to use tricks in tools never meant for true animated storyboarding. Thoughts?
chris@usermatters.com
Very nice article. I am a Visio beginner and have a question about macros needed for this example. I downloaded the storyboard.zip and was able to go through animation of the example storyboard (inlineEditWireframeExample). Although, when I created my own storyboard following explanation it did not work. I assume there are some extra macros that my drawing should have because when I copied my drawing to inlineEditWireframeExample it worked. Can anybody please explain how can I use macros used in inlineEditWireframeExample in my storyboard.
Thanks!
New to the technology.
Found this useful and instructive, including reader comments.
Thanks
Great article, and I’d really like to trying this method out. Unfortunately, I currently only have a copy of Visio 2002, SP2. I was wondering if there were any particular aspects of the shape designs in your stencils that are not compatible with Visio 2002 as I’d like to try creating a similar set of stencils for that version of the application. (Unless, of course, it’s possible for you to create copies of your original files that are saved to be compatible with Visio 2002, which would be very helpful.)
Thanks,
Jenni
Thank you for the great article and for the visio template. However, I too had trouble getting my own implementation to work. The custom property in the storyboard to show and hide layers did not work, (or at least I couldn’t get it to work), so I’m having to record macros to show and hide layers, which I’m finding to be tedious and not scalable. Can anyone tell me if there’s a trick to using the Target Layers property?
Thanks,
Jennifer
The only thing I haven’t been able to master with this code is the ability to take any shape and make it execute the macros. I’m certainly not a VBA programmer so it might be easier than I think, but the shapes in the stencil have a behavior set as “blank” and I can’t set my shapes to that, they demand a function.
Any ideas? I’m currently just modifying the existing shapes from the master when needed.
Thanks,
Brad
Great post! It helped me a lot when I started my wireframing career. 🙂
Here’s a plug-in for Visio that I made – it makes wireframing waaaay faster & more fun, and it allows you to generate clickable prototypes of your work:
http://www.visioworkflow.com/
Cheers,
Julien
Great article Bill. I find that good wireframes (in visio or other packages) give great ops for more collaborative design at earlier stages in the project. They are quicker, cheaper and you can draw all over them.
The IA Institute (www.iainstitute.org/tools/) offer a number of wireframe templates and stencil downloads – saves a lot of time and learning how to build your own.
Would you be able to share some of the stencils you demo’d in the article?
Great article, and I like the interactive shapes – but wouldn’t this only work for showing a client in-person using Visio?
If you took it a step further in naming the layers and adjusting the content a bit it could work as a PDF (using Create PDF), although it wouldn’t be as elegant because the person viewing the PDF would have to click through the layers.
I’d think if you wanted to model this type of simple interaction you’d be better off using something like Fireworks, where you can export that functionality to a format that’s easier to send out.
Absolutely. You can read about the stencil library at http://looksgoodworkswell.blogspot.com/2005/11/visio-wireframe-toolkit-for-download.html
You can either download it from there or from the link that is in the article.
I would be happy to have a link posted on the http://www.ianinstitute.org/tools site. I will contact them to see about getting it posted.
Thanks!
Bostich,
You have a very valid point. In that you cannot distribute the interactive variety of Visio over the web. Saving as HTML pages will only allow the hyperlink feature of Visio to work and not the layers functionality (which is a shame).
However, in our case this was easily solved by having our clients either download the free Visio Reader available from MS or capturing a movie of the interaction with either a product like SnagIt or Breeze (if you want to easily annotate it.) Of course it was not too uncommon for them to have Visio (especially in the corporate environment of the airlines.)
I have had a couple of other colleagues mention fireworks, but I have not had the time to dig deeply into it. It does appear to be a really nice tool for something like storyboarding.
I have spent some time using Photoshop to do the same things mentioned here. In fact in the link in my blog the presentation there discusses photoshop animation. In CS2 there is an animation palette and in CS they added layered comps (a way to name layers). This works pretty nicely. I have created some really quick drag and drop animations exploring different cinematic effects and transitions.
I discuss photoshop animations in my blog at: http://looksgoodworkswell.blogspot.com/2005/11/animating-interactions-with-photoshop.html
I like others am still searching for the tool that pulls it all together.