To tackle the classic “how to prototype rich interactions” problem, I developed a process for translating static screen designs (from wireframes to visual comps) into interactive experiences using Flash. Requiring some fairly basic ActionScript knowledge, these prototypes proved to be a quick yet powerful way to bring interaction designs to life.
When asked if I could find a quick and easy way to prototype a web application my project team had wireframed in Visio, I first turned to PDF prototyping. Using a PDF of the wireframes as the base, I overlaid clickable elements and some interactive data entry fields. Everything was wonderful—until the client asked us to add color to the wireframes. The Visio document was updated, a new PDF had to be made… and all that interactivity had to be reapplied. (It is tedious and time-consuming to replace page content in a PDF.)
Not wanting to repeat this tedious process again and again, I turned to Flash. I was excited to find that Flash not only felt more streamlined and intuitive when creating basic click-throughs, but it also offered almost limitless potential for prototyping rich interactions. With some basic ActionScript (a scripting language used in Flash to define interactions) knowledge and a bit of resourcefulness, I was able to create functional combo box navigations, type-ahead mechanisms, and eventually a complex, drag-and-drop scheduling application similar to Google Calendar. And whenever the screen designs changed, all I had to do was import the new background images, while the interactivity layers stayed happily in place, requiring only minimal tweaking.
Quick and easy yet powerful and flexible
The idea of working with Flash may seem daunting, but the effort required to create a basic click-through is comparable to that required by other applications, while the flexibility and potential for extending the prototype is far greater. (After all, Flash was designed for creating interactive applications, not presentations [like PowerPoint], diagrams [like Visio] or portable documents [like Acrobat].) Considering the additional benefits it offers, Flash prototyping is well-worth adding to your interaction design toolkit:
- Flash prototyping allows you to add interactivity to screen designs and wireframes you’ve already created. You don’t have to recreate the layouts in another application.
- Flash allows screen images to be updated without losing your interactive layers, which is much more difficult in PDF prototyping, as I described above.
- Flash includes a robust library of customizable user interface components that can be dropped into your prototype and used as they are to add realism (e.g., a text field you can actually type in) or programmed using ActionScript to serve as fully-functional interface controls.
- You can export prototypes as stand-alone applications (suitable for running from a thumb-drive at an on-site usability test where the Flash plugin may be blocked) or as HTML pages with embedded Flash (in which the browser can be used to scroll up and down through tall prototypes).
- You don’t have to hire a professional Flash developer to achieve all of this. (I’m certainly not a Flash expert.) You can create simple, yet believable, prototypes with very little knowledge of ActionScript. All it takes is resourcefulness, creativity, and experimentation.
A valuable tool and impressive deliverable
Flash prototypes can be both a valuable tool for project teams and an impressive deliverable for clients. At the consultancy where I first employed Flash prototyping, these prototypes quickly became an invaluable part of the design, testing and buy-in process for many projects, and clients loved them. Here’s why:
By experiencing the interactions we were proposing, we were able to quickly sense when something that seemed good on paper didn’t feel right in reality.
By testing realistic prototypes, which users perceived to fully-functional, we were able to collect accurate user feedback about how novel interactions (such as a type-ahead search) felt and functioned in a real context.
By providing clients with functional demos, we were able to see our concepts move towards reality as clients enthusiastically used them to rally organizational support for concepts.
Having learned a lot through trial and error in creating these prototypes, I’d now like to share the process I developed through a step-by-step tutorial.
How to use this tutorial
In this tutorial, you’ll be creating a practice prototype using static screen images from Facebook that I’ve annotated using Visio. You should be able to complete it in 1 hour or less. To see what you’ll be creating, you can try out the final prototype files:
You’ll also want to download the files needed to complete this tutorial:
If you don’t have Flash CS3 or higher, you can download a 30-day, fully-functional trial from:
The major steps of this tutorial are in bold. If you have some Flash experience, you may be able to complete the tutorial using the bold steps and the annotations on the screens. For those who are new to Flash, I’ve provided detailed sub-steps and definitions.
Table of Tutorial Steps
Preparing screen designs for prototyping
To prepare for Flash prototyping, you’ll need to have images showing each possible screen and state in the scenarios you want to demonstrate. Often, you’ll have already created many of these screen designs in the wireframing phase of your project. The fidelity of these images may range from wireframes to visual design comps, depending on your prototyping needs. It doesn’t matter what software you use to create your images (e.g., Visio, Illustrator, Photoshop, etc.), as long as you can export them as raster images (e.g., GIF, PNG, JPG).
While images have already been prepared for you in this tutorial, here are some helpful tips for creating and exporting screen designs for use in Flash:
Creating the screens
Create neat layouts using grids and guides to keep items aligned from page to page to prevent inappropriate jumpiness (if only part of a page is supposed to be changing, such as when a menu appears, and the entire page shifts a little, it will detract from the prototype’s realism). Test page-to-page alignment by viewing images full-screen.
Ensure that images are all the exact same size by using a common background image or canvas size for all screens. In Visio and other page layout applications, you must be sure to remove or hide anything that protrudes outside of this background before exporting. Placing annotations that don’t belong in the prototype and anything else that will exist outside of the content area (page titles, footers) on a separate layer allows them to hidden before exporting the images.
Planning interactivity
Add a unique identifier to each screen or page that, unlike the page numbering (if you’re using a page layout program), will not change. You’ll be saving each screen as a file named after this identifier (e.g., “W05.png”). Using these identifiers, if your page ordering changes or you add or delete pages, you’ll still know which page corresponds with which exported image later.
Mark up the screens with callouts explaining everything that should be interactive and what should happen when elements are interacted with. For a basic click-through, most of these callouts will point to an element and read, “Go to X” (where X is the target page identifier). Make sure these callouts don’t extend outside of the image area. These callouts will make the Flash work much easier, and the callout version of the prototype makes a useful “practice prototype” that can help future users learn how to navigate the prototype. You’ll re-export the images and create a version of the prototype without callouts later.
Saving or exporting images
Save or export each screen as an image that will fit on a screen without scaling (preferably a lossless file such as GIF or PNG) using the page identifier as the filename. If you’re using vector-based software (like Visio), make sure the resolution of the exported files is set so that the resulting images will fit on the screen without scaling or scrolling. If your screen dimensions are 1024×768 points, for example, and you want the resulting images to be 1024×768 pixels, you would need to set the export resolution to 72×72 pixels/in.
Welcome to Flash
Note: If you don’t see some of these panels, use the Window menu to locate and turn them on.
You’ll be introduced to each of these elements and to key principles of ActionScript as you work through this tutorial. In the Appendices at the end of this document, you’ll find a handy reference guide and summary of everything you’ll have learned about Flash and ActionScript.
Setting up the Flash document
The images needed to complete this tutorial from scratch can be found in the SourceImagesAnnotated folder of this zip file:
While setting up the Flash document may feel tedious, what’s exciting about Flash prototyping is that after you’ve set up a document once, you can save your work as a template for future prototypes so that you don’t have to start from scratch. All you’d have to do to start a new prototype is import a new set of images with the same filenames and add or remove keyframes as needed depending on the number of screens.
If you’re already familiar with Flash basics and would like to skip to creating interactions, you can download an already-set-up template and begin working through the tutorial from the “Basic principles of interaction” section.
Creating a new prototype template
1. Create a new Flash document that uses ActionScript 2.0 and has a 1024px by 768px stage.
1.1. Open Flash and create a new Flash File (ActionScript 2.0).
ActionScript 2.0 vs. ActionScript 3.0
The latest version of ActionScript is ActionScript 3.0, a much more sophisticated but unfortunately a little harder to comprehend rendition of the language. Because AS 2.0 is a little more direct and intuitive (you can add scripts directly to buttons and objects), I recommend starting there. In fact, if you’re only using Flash for simple applications (like most prototypes will be), AS 2.0 is all you really need. If you eventually want to catch up with the AS 3.0 trend, understanding AS 2.0 first can help you make the conceptual leap to AS 3.0.
When working in ActionScript 2.0, you’ll want to make sure that tutorials and scripts you find online and in books are compatible. Look for tutorials written for Flash MX 2004, Flash 8, or Flash CS3 using ActionScript 2.0.
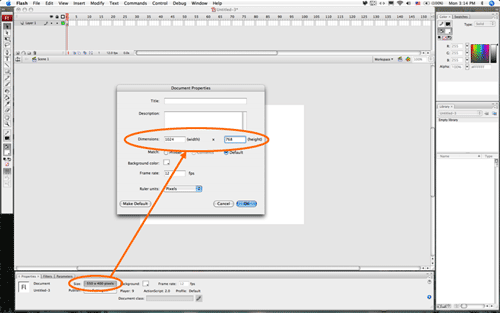
1.2. To define the size of the stage, in the Properties Panel, click the button next to "Size" that shows its current dimensions. Change the dimensions to the size, in pixels, of your exported screen designs—1024px by 768px in this tutorial. Press "OK.”
The Stage is your visual workspace or canvas. This is where you’ll specify where objects appear. Objects in the grey area outside the stage will not be visible when the exported flash movie is viewed at the correct size.
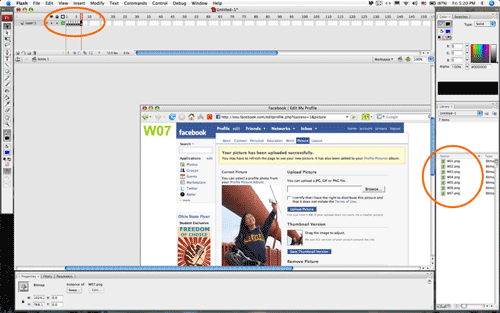
2. Import the images to keyframes by using Import to Stage and selecting the first file in the sequence. Flash will automatically prompt you to import the rest of the files and place each image on its own keyframe.
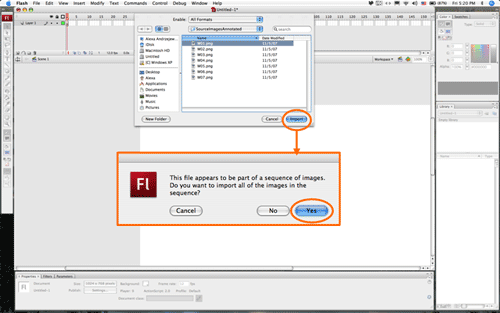
2.1. From the File menu, go to File > Import > Import to Stage. Browse to the folder where your images are located and select only the first image in the series—“W01.png.” Click "Import."
2.2. A dialog will appear asking if you want to import all of the images in the sequence. Click “Yes.” All of the images will be imported to your Library and automatically placed on separate keyframes in the timeline.
The Timeline is where you define when objects appear or disappear from the stage. The timeline contains frames and keyframes which can be on multiple, independent layers. The layers in Flash work in an identical fashion to layers in Photoshop.
Frames are displayed as blocks. They are grey when they contain content and white when they are empty.
Keyframes are frames marked with circles or dots. A keyframe is a frame where a change can occur without affecting the previous frames. Changes made on keyframes persist until the next keyframe unless “tweening” is used to fill in the blanks. You can also add commands (ActionScript) to keyframes, which will be executed when the player reaches that frame.
2.3. Note that when you click to select one of the screen images, you’ll notice that the properties of this image are shown in the Properties Panel, including its X and Y position on the stage (measured from the upper-left corner by default). The X and Y positions should both be “0” by default. If you ever move one of the images out of place accidentally, you can use the Properties Panel to place it back in the upper-right corner by re-entering “0,0” as its position.
The Properties Panel is context-sensitive—it shows/allows you to set properties for the last frame or instance that you selected. It is shown at the bottom of the Flash interface.
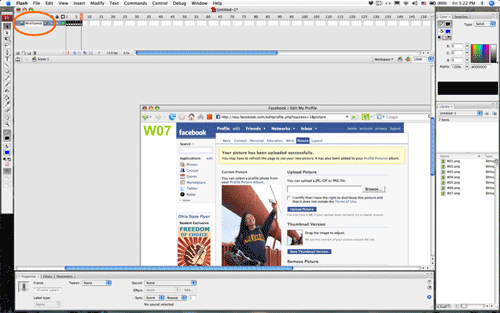
3. Name the current layer, “Wireframes.” Label each keyframe using the image’s identifier. Insert four frames between every keyframe to make these labels visible.
3.1. In the Layers area at the top of the workspace, double-click on the words, "Layer 1" and type "Wireframes." Press Enter to commit the change.
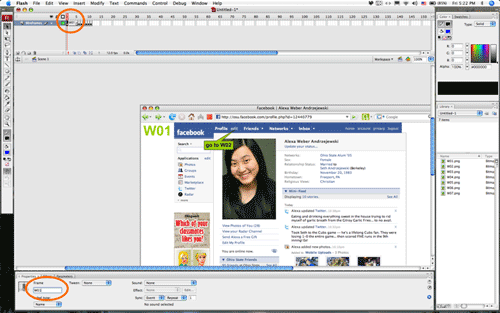
3.2. Click on the first keyframe to highlight it.
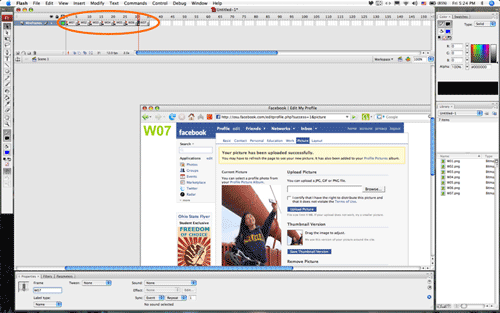
3.3. Press F5 four times to insert four frames after this keyframe.
3.4. With the first keyframe still selected, in the Properties Panel, change “” to the image’s identifier, “W01” (remember, ActionScript is case sensitive).
Frame Labels can be assigned to keyframes so that they can be referred to using ActionScript. It is generally better to refer to frame labels in ActionScript than to frame numbers because frame numbers are subject to change as you add or remove frames.
3.5. Click on the second keyframe to highlight it. Insert four frames after it and label it “W02.” Repeat for the remaining keyframes, including the final one. This part may seem a little tedious, but you should not have to repeat it again unless you insert additional screens. You’ll be able to update these images without recreating the keyframes and labels in the future.
The Properties Panel is where you can assign frame labels to frames and instance names to instances.
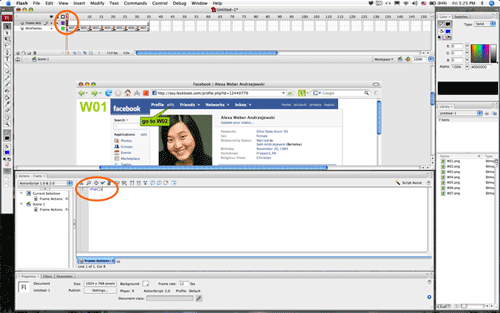
4. Create a new layer called, “Frame Actions.” Make sure the Flash movie does not automatically play by adding a “stop();” action to the first frame.
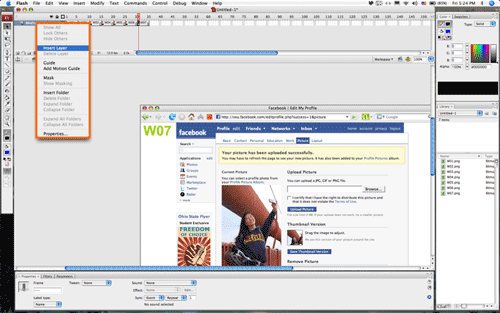
4.1. Right-click or Ctrl+click (Mac) on the first layer’s name and choose “Insert Layer.”
4.2. Rename the new layer, “Frame Actions.”
4.3. Select the first keyframe in this new layer.
4.4. Go to Window > Actions to turn on the Actions Panel.
The Actions Panel is context-sensitive—it shows/allows you to add scripts to the last frame or instance that you selected. Look at the tab name near the bottom of the Actions Panel to verify what you are adding actions to.
4.5. With the first keyframe selected, type the following in the Actions Panel:
stop();
Notice that a small “a" appears in the middle of the keyframe to indicate that actions will be triggered when that frame plays.
ActionScript is case sensitive.
Semicolons should be used at the end of every statement (generally every line).
Frame Actions are attached to keyframes and are triggered when that frame is reached.
Functions are built-in actions that you can call on using keywords. These commands are keywords followed by parentheses in which specific details can be added if necessary.
Creating a reusable button
5. Create a button symbol. Make the button invisible—an invisible button is clickable but does not display anything on the stage when the Flash file is compiled: It has a clickable area (a “Hit” state) but no visible states (Up, Over, and Down are all blank). This button should be a rectangle and the size of an average clickable area in your prototype. You’ll be able to resize instances of this button as needed. You will be using this button overlay to simulate most interactions.
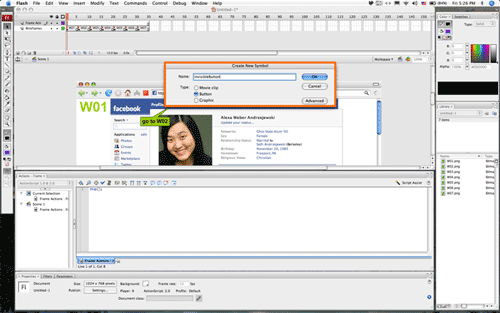
5.1. Go to “Insert > New Symbol…”
Symbols are objects that can be used and reused. They are similar to Shapes in Visio and Stencils in Omnigraffle. Symbols include imported content, Movie Clips (objects that can have their own, independent timelines), Buttons (special movie clips with four frames in which four possible button states can be created), and Graphics (objects that may contain drawings and/or imported images).
5.2. In the dialog that appears, name it "invisibleButton" and choose the type "Button."
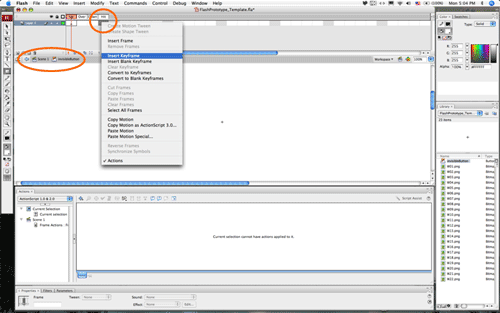
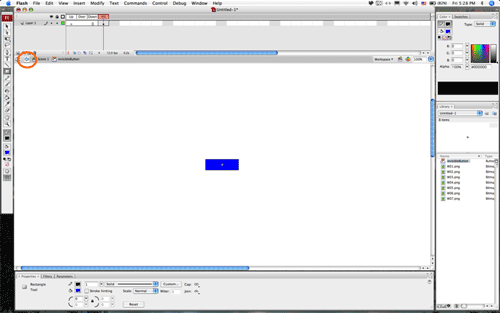
5.3. Notice in the Edit Bar that you are now editing “invisibleButton.” This button’s “timeline” consists of four labeled frames. Each frame represents a unique button state. Typically, you would draw what the button looks like normally in the “Up” frame, you’d draw the rollover state in the “Over” frame, and you’d draw the pressed state in the “Down” frame. “Hit” is an invisible state used to designate the clickable area of a button. Since you want your button to be invisible, you will only be creating the “Hit” state. Right-click or Ctrl+click (Mac) on the frame labeled, “Hit” and choose “Insert Keyframe.”
The Edit Bar (Navigation Area) indicates which timeline you are currently viewing. In this tutorial, you will generally be working on the main timeline, labeled “Scene 1” by default, but you will eventually be creating objects that have their own, independent timelines. These objects can be nested inside of each other. When you are inside an object’s timeline, a breadcrumb trail will indicate where you are in the grand scheme of things, e.g., Scene 1 > CarObject > WheelObject.
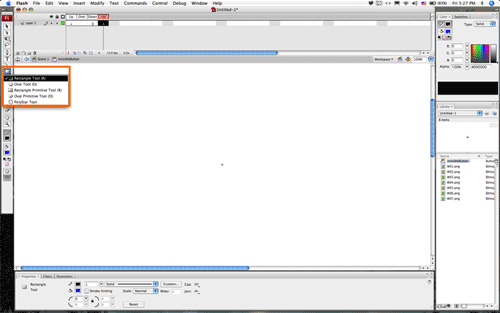
5.4. Using the Rectangle Tool and Fill Color picker if necessary, draw a solid-colored box on this keyframe. The color does not matter, as it will not be visible. It also doesn’t matter exactly what shape and size it is—you’ll be resizing each instance as needed. Just make it the size of a typical button in your prototype.
The Tools Bar contains tools you can use to create and manipulate graphics and objects on the stage.
5.5. In the Edit Bar, click the Back Arrow or "Scene 1" to go back to the main movie.
5.6. Your "invisibleButton" symbol should appear in the Library Panel.
Creating a layer for interactive elements
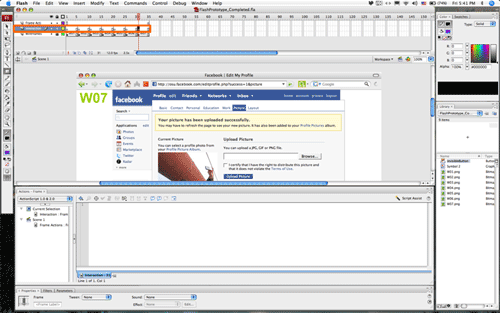
6. Add another layer to your movie, called “Interaction,” for buttons and controls. In this layer, insert one keyframe per screen.
6.1. Right-click or Ctrl+click (Mac) on the “Wireframes” layer’s name and choose “Insert Layer.”
6.2. Rename the new layer, “Interaction.”
6.3. Lock the “Wireframes” layer by clicking in the padlock icon column to prevent accidental changes.
6.4. Right-click or Ctrl+click (MAC) on the frame above the keyframe labeled, “W02” and choose “Insert Keyframe.” Repeat, inserting a keyframe in this layer above every labeled keyframe.
Basic principles of interactivity
I’ve provided a Flash file in which all the steps to this point have been completed so that you can experiment with the more interesting aspects of Flash prototyping. If you’d like to start the tutorial from this point, open the file called FlashPrototype_Template.fla from this zip file:
Creating a basic click-through
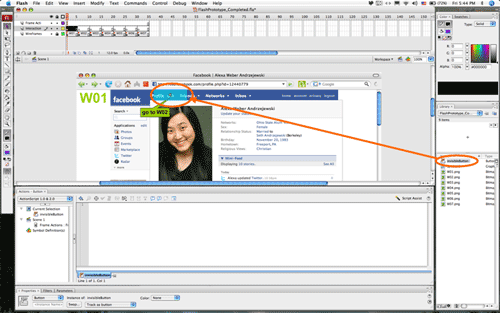
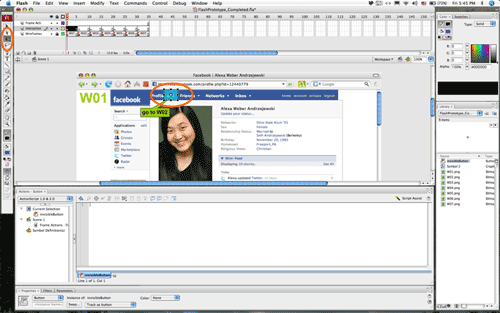
7. Place invisible buttons over all the “go to X” elements in the images (the ones specified using green callouts). Add gotoAndStop(“frameLabel); actions to each button, telling Flash to go to the frame label specified in the annotations when that button is released.
7.1. Click on the first keyframe of the Interaction layer.
7.2. Drag an instance of the invisibleButton onto the stage and drop it over the “Edit” button in the screen design. It should appear to be a transparent, blue area. You can use the Free Transform Tool (which you can find in the Tools bar) to make it cover just the area that should be clickable.
Instances are unique occurrences of symbols in your Flash movie. You can drag as many instances of a symbol into your movie as you like. If you update the symbol, all of its instances will be updated as well, however, certain properties (such as scaling and positioning) can be customized on an instance-by-instance basis. Later you’ll learn how to name instances so you can refer to them specifically using ActionScript.
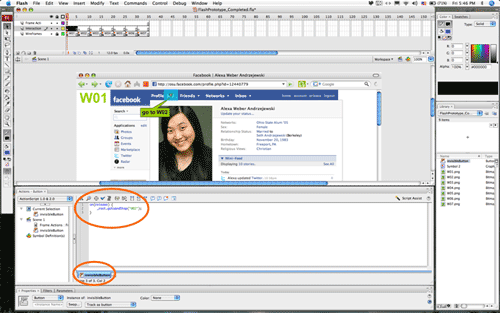
7.3. Next you are going to make the button interactive. When you add an action to an object (vs. to a keyframe, as you did earlier), it must be contained within an “Event Handler” so that Flash knows when to execute the action. With the button selected, type this Event Handler in the Actions Panel:
on(release) {
}
Event Handlers are used to specify behaviors that trigger actions. Actions contained within an event handler’s curly braces will be triggered only when the event preceding them occurs (e.g., when an button is pressed and when it’s released).
7.4. All of the actions that should happen when the button is clicked and then released should go within the two curly braces. You’re going to use the gotoAndStop(“frameLabel”) function to tell the prototype to go to the frame labeled “W02” when the button is clicked and released.
on(release) { // When this event occurs…
gotoAndStop(“W02”); // these actions should be triggered.
}
Curly braces can be used to group statements.
Comments that don’t affect the code can be added by preceding comment text with two forward slashes.
7.5. To ensure that the main timeline is controlled (vs. the timeline of the button the script is attached to), you can precede gotoAndStop with the name of the timeline you’re targeting. The main timeline is referred to as the “_root” in ActionScript. The final script should read:
on(release) {
_root.gotoAndStop(“W02”);
}
Actions are context-sensitive. They act on whichever movie or timeline they are attached to. If actions are placed in the main timeline, they’ll act on the main movie. If they’re placed on a timeline within an object, they’ll only act on that object unless otherwise specified.
To target specific timelines and objects, refer explicitly to the main movie as “_root” and other objects by their assigned “Instance Names.” If you’re unsure which object an action applies to, use explicit targets to ensure your actions will work as intended. You’ll learn more about Target Paths later.
7.6. If you go to Control > Test Movie (Ctrl+Enter on PC, Apple+Enter on Mac), you should see that the button symbol is invisible, but that you can still click on it to go to frame “W02.” It gives you the impression that the “Edit” link is working—your pointer should change to a hand cursor, and clicking the link should take you to frame “W02.”
7.7. On keyframes W02 through W04, wherever you see a green, “go to X” callout, add an invisible button with the appropriate script. The easiest way to do this is to copy and paste the button you’ve already created. This creates a new instance of the button while preserving the script you’ve added to it. All you have to do is change the destination frame label.
7.8. Test your prototype (Ctrl+Enter on PC, Apple+Enter on Mac). You should be able to follow the trail of green callouts through the first five frames.
That’s all there is to creating a basic click-through using Flash. The prototype at this point should be comparable to what you could create in Visio, PowerPoint or Acrobat.
What makes Flash a worthwhile prototyping tool, however, is that it makes it easy to add realism and “smarts” to your prototypes. Flash’s “Components Library” offers a robust collection of customizable user interface components that can be dropped into your prototype and used as they are to add realism (e.g., a text field you can actually type in) or programmed using ActionScript to serve as fully-functional interface controls. Using one of these components and some simple ActionScript, you’ll next learn how to add basic logic to your prototype.
Adding a conditional button
There are many applications for conditional buttons in prototypes, including demonstrating error handling.
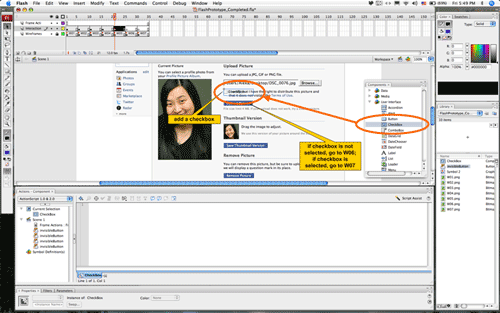
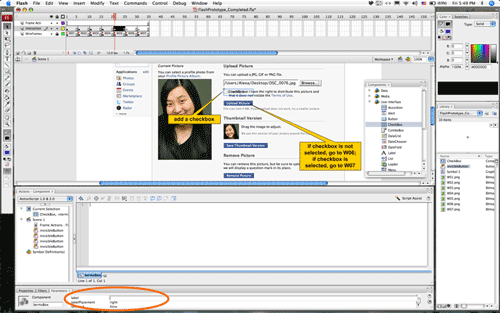
8. Add a CheckBox component named “termsBox” to frame “W05” of the “Interaction” layer.
8.1. Select the keyframe in the “Interaction” layer above the frame labeled “W05.”
8.2. Open the Components library (Window > Components).
The Components Panel contains a special library of user interface objects, such as radio buttons and combo boxes, and have customizable properties. These properties can be edited in the Parameters tab of the Properties Panel and/or changed using ActionScript.
8.3. In the “User Interface” folder, you’ll find the CheckBox component. Drag it onto the screen and place it over top of the check box in the image.
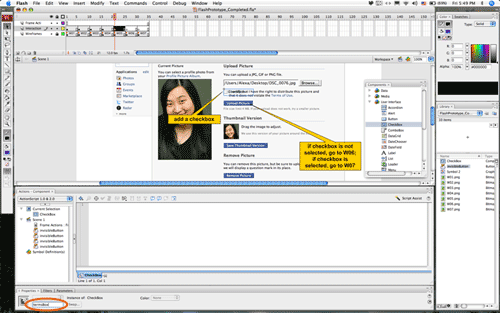
8.4. In the Properties tab, give the Instance Name, “termsBox” to this checkbox.
An Instance Name can be assigned by selecting an instance and entering a unique name in the Instance Name field in the Properties Panel. Since a symbol in your library can be used in your Flash movie multiple times, each occurrence needs to have a unique name if you want to address it using ActionScript.
8.5. With the check box selected, in the Properties Panel, click the Parameters Tab. Select the “Label” field in the Parameters Tab and delete the label text.
The Parameters tab of the Properties Panel is where you can edit the special properties of components. Each property is listed on a separate line.
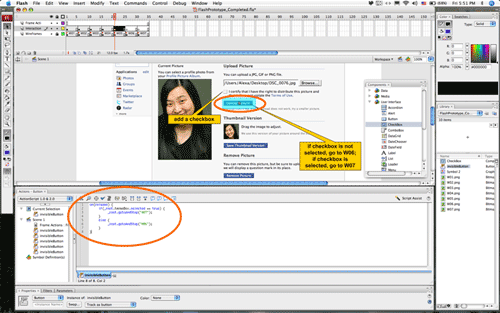
9. Create an invisible button that determines whether the check box is selected or not and sends the prototype to the appropriate screen.
9.1. Drag an invisible button over the "Upload Picture" button on frame “W05.”
9.2. Select this button, and in the Actions Panel, add an event handler:
on(release) {
}
9.3. Within this event handler, you’re going to add a conditional statement, an “if Statement,” to check whether “termsBox” is selected. The condition contained within the “if statement” will be tested when the event (on release) occurs. It is constructed as follows:
on(release) {
if(CONDITION) { // If this condition is met…
// perform all actions contained within these curly braces.
}
else { // Otherwise…
// do these actions.
}
}
The If Statement describes a condition that must be met for certain action(s) to be performed. It can optionally be followed by an “else” statement specifies what to do otherwise.
9.4. The condition that you’re checking for is whether the “selected” property of “termsBox” is “true.” To refer to properties of objects, use the object’s target path, followed by the name of the property (for example, _root.termsBox.selected).
Target Paths are like web URLs or file paths, only they use dots (.) instead of slashes to indicate hierarchy. Eventually you’ll be using ActionScript to address movies inside of other movies. An easy way to do so is using “absolute paths,” which indicate the location of an object relative to the main movie (the “root”) using objects’ instance names. (For example, to address an object with the instance name “spokes,” you might write: _root.car.wheels.spokes) You can also use “relative paths,” which you can learn more about in Flash’s documentation.
Properties of an object are special keywords that Flash recognizes. You can evaluate or change properties of an object using ActionScript. Components, movie clips and other types of objects all have unique properties. You can look up a particular object type’s properties and their possible values in Flash’s documentation.
9.5. To test whether something is equal to something else, you’ll use the “equals” operator, which consists of two equals signs. Your condition will read:
on(release) {
if(_root.termsBox.selected == true) {
}
else {
}
}
Operators are used in If Statements to compare one value to another in the format, “if(x OPERATOR y).” The most common operators are:
== equals
> is greater than
< is less than
!= is not equal to
<= is less than or equal to
>= is greater than or equal to
9.6. The complete script that will be placed on the button, which includes the actions that should happen when the condition is met or not met, is:
on(release) {
if(_root.termsBox.selected true) {
_root.gotoAndStop("W07");
}
else {
_root.gotoAndStop("W06");
}
}
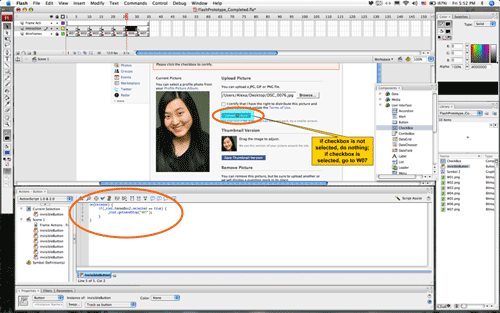
9.7. Repeat steps 8 and 9 on the next keyframe, “W06,” only name the checkbox “termsBox2” and add this script to the button:
on(release) {
if(_root.termsBox2.selected == true) {
_root.gotoAndStop("W07");
}
}
10. Test your prototype (Ctrl+Enter on PC, Apple+Enter on Mac). Try selecting the checkbox and clicking the button. Test it again and see what happens when it is not selected. You should be able to complete the entire first part of the prototype.
10.1. If it doesn’t seem to work, you may want to:
10.2. Make sure your scripts were attached to the button, NOT to the checkbox or to the keyframe.
10.3. Check that your syntax is correct (don’t forget your {,}, and ;).
10.4. Ensure that your buttons point to the correct frame labels.
Exporting your prototype
If you made it this far, good job! You’ve learned some of the fundamentals of Flash and ActionScript and have created a simple, yet smart prototype. All that’s left is exporting the prototype as a stand-alone file that can be shared with clients and usability testers. To do this:
11. Go to File > Publish Settings. Choose “Windows Projector” or “Macintosh Projector” (or both), enter a file name, and press “Publish” to create a standalone, self-executing file of your prototype. It will be created in whatever folder the Flash file is in.
While the annotations make the prototype easy to test and navigate, it wouldn’t be very challenging for test participants! To make a version of the prototype that is not annotated:
12. Remove or hide the annotations in the software you used to create the screens.
13. Export or save each of the screens to a new folder using the same file names that you used before. Flash doesn’t care what folder an image comes from, if it has the same name, it considers it to be the same image.
14. In Flash, use “Save As…” to create a new copy of the prototype.
15. Go to “File > Import > Import to Library” and import all of the final images at once (use Ctrl+A or Apple+A to select all). Since the names of these images match the names of the images you imported previously, Flash will ask you whether you want to replace the existing items. Since this is exactly what you want, select “Replace existing items” and press “OK.”
16. Click through each keyframe to make sure the prototype looks right (the buttons are aligned properly and the screens are updated).
17. You can now publish another copy of the prototype without the annotations by going to “File > Publish Settings” and giving the files new names.
Resourcefulness, creativity, and experimentation
Using only the principles learned in this tutorial and a little resourcefulness, creativity, and experimentation, you can create quite robust prototypes. In fact, using just what you’ve already learned, you could conceivably simulate rich interactions ranging from fly-out menus to type-ahead search.
Look for a follow-up article that will show you more examples of what’s possible.
The wonderful thing about Flash is that Flash prototypes can be as simple or as complex as they need to be. Start building your click-through prototypes in Flash. Once you’ve built a few of those, try a scenario that involves a little logic. When a more complex situation arises (“Could you make this area turn yellow when you drag that icon over it?”), do some research on sites like ActionScript.org to see if you can find an easy way to show it or at least fake it.
While you may not be able to take full advantage of Flash’s prototyping potential immediately, the benefits of using Flash, even when creating simple prototypes, make it a worthwhile addition to any interaction designer’s toolkit.
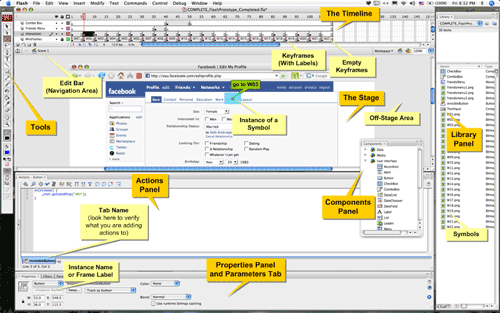
Appendix A: The Flash Interface
Note: If you don’t see some of these panels, use the Window menu to locate and turn them on.
The Stage is your visual workspace or canvas. This is where you’ll specify where objects appear. Objects in the grey area outside the stage will not be visible when the exported flash movie is viewed at the correct size.
The Timeline is where you define when objects appear or disappear from the stage. The timeline contains frames and keyframes which can be on multiple, independent layers.
Frames are displayed as blocks. They are grey when they contain content and white when they are empty.
Keyframes are frames marked with circles or dots. A keyframe is a frame where a change can occur without affecting the previous frames. Changes made on keyframes persist until the next keyframe unless “tweening” is used to fill in the blanks. You can also add commands (ActionScript) to keyframes, which will be executed when the player reaches that frame.
Frame Labels can be assigned to keyframes so that they can be referred to using ActionScript. It is generally better to refer to frame labels in ActionScript than to frame numbers because frame numbers are subject to change as you add or remove frames.
The Edit Bar (Navigation Area) indicates which timeline you are currently viewing. In this tutorial, you will generally be working on the main timeline, labeled “Scene 1” by default, but you will eventually be creating objects that have their own, independent timelines. These objects can be nested inside of each other. When you are inside an object’s timeline, a breadcrumb trail will indicate where you are in the grand scheme of things, e.g., Scene 1 > CarObject > WheelObject.
The Library contains symbols—the “actors” that appear on the stage. Symbols are objects that can be used and reused. They are similar to Shapes in Visio and Stencils in Omnigraffle. Symbols include imported content, Movie Clips (objects that can have their own, independent timelines), Buttons (special movie clips with four frames in which four possible button states can be created), and Graphics (objects that may contain drawings and/or imported images).
Instances are unique occurrences of symbols in your Flash movie. You can drag as many instances of a symbol into your movie as you like. If you update the symbol, all of its instances will be updated as well, however, certain properties (such as scaling and positioning) can be customized on an instance-by-instance basis. Later you’ll learn how to name instances so you can refer to them specifically using ActionScript.
The Components Panel contains a special library of user interface objects, such as radio buttons and combo boxes, that have customizable properties. These properties can be edited in the Parameters tab of the Properties Panel and/or changed using ActionScript.
The Actions Panel is context-sensitive—it shows/allows you to add scripts to the last frame or instance that you selected. Look at the tab name near the bottom of the Actions Panel to verify what you are adding actions to.
The Properties Panel is also context-sensitive—it shows/allows you to set properties for the last frame or instance that you selected. This is where you can assign frame labels to frames and instance names to instances. The Parameters Tab of this panel is where you can edit the special properties of components. Each property is listed on a separate line.
The Tool Bar contains tools you can use to create and manipulate graphics and objects on the stage.
Appendix B: ActionScript Recap
You don’t need a deep understanding of ActionScript to create convincing prototypes. Simply understanding the following principles, all of which you’ve already put into practice in this tutorial, can take you a long way.
ActionScript 2.0 vs. ActionScript 3.0
The latest version of ActionScript is ActionScript 3.0, a much more sophisticated but unfortunately a little harder to comprehend rendition of the language. Because AS 2.0 is a little more direct and intuitive (you can add scripts directly to buttons and objects), I recommend starting there. In fact, if you’re only using Flash for simple applications (like most prototypes will be), AS 2.0 is all you really need. If you eventually want to catch up with the AS 3.0 trend, understanding AS 2.0 first can help you make the conceptual leap to AS 3.0.
When working in ActionScript 2.0, you’ll want to make sure that tutorials and scripts you find online and in books are compatible. Look for tutorials written for Flash MX 2004, Flash 8, or Flash CS3 using ActionScript 2.0.
ActionScript Grammar
ActionScript is case sensitive. Semicolons should be used at the end of every statement (generally every line). Curly braces can be used to group statements. Comments that don’t affect the code can be added by preceding comment text with two forward slashes.
Making something happen using ActionScript
First, when do you want it to happen?
- When a particular frame is reached: Frame Actions are attached to keyframes and are triggered when that frame is reached. For example, you might select the last keyframe in a movie and add a “stop();” action so that the movie will not loop when it reaches the end.
- When a specific event occurs: When you add actions to objects on the stage, you must use one or more event handlers to specify exactly when they should be executed. Event Handlersare used to specify behaviors that trigger actions. Actions contained within an event handler’s curly braces will be triggered only when the event preceding them occurs (e.g., when an button is pressed and when it’s released). Useful event handlers include:
on(press) { } on(release) { } on(rollOver) { } on(rollOut) { }
- The above, but only when a particular condition is met: Within Frame Actions and Event Handlers, you can add additional conditions that must be met for an action to be performed. Note that the condition will be evaluated only when the frame is reached or event occurs. The If Statement describes a condition that must be met for certain action(s) to be performed. Its form is: “if(CONDITION) {ACTIONS}”It can optionally be followed by an “else” statement specifies what to do otherwise. Operators are used in If Statements to create conditions by comparing one value to another in the format, “if(x [operator] y).” The most common operators are:
== equals
> is greater than
< is less than
!= is not equal to
Multiple conditions can be combined using the operators:
&& and
|| or
For example, if(x false && y false) means “if x is false AND y is false.”
Next, which object or timeline are you commanding?
- Actions are context-sensitive. They act on whichever movie or timeline they are attached to. If actions are placed in the main timeline, they’ll act on the main movie. If they’re placed on a timeline within an object, they’ll only act on that object unless otherwise specified.
- To target specific timelines and objects, refer explicitly to the main movie as “_root” and other objects by their assigned “Instance Names.” An Instance Name can be assigned by selecting an instance and entering a unique name in the Instance Name field in the Properties Panel. Since a symbol in your library can be used in your Flash movie multiple times, each occurrence needs to have a unique name if you want to address it using ActionScript. If you’re unsure which object an action applies to, use explicit targets to ensure your actions will work as intended.
- When objects are nested inside each other (every object is technically nested inside the main movie, or the _root), address them using their complete “target paths.” Target Paths are like web URLs or file paths, only they use dots (.) instead of slashes to indicate hierarchy. Eventually you’ll be using ActionScript to address movies inside of other movies. An easy way to do so is using “absolute paths,” which indicate the location of an object relative to the main movie (the “root”) using objects’ instance names. (For example, to address an object with the instance name “spokes,” you might write: root.car.wheels.spokes) It doesn’t hurt to get in the habit of always referring to the main movie as “_root”—as this becomes important when using embedded movie clips.You can also use “relative paths,” which you can learn more about in Flash’s documentation.
Finally, what do you want to happen?
- You can use Flash’s many built-in functions to perform all kinds of actions. Functions are built-in actions that you can call on using keywords. These commands are keywords followed by parentheses in which specific details can be added if necessary. Some useful functions for prototyping include:
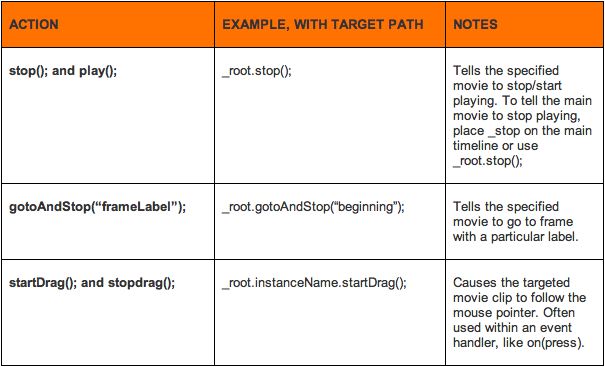
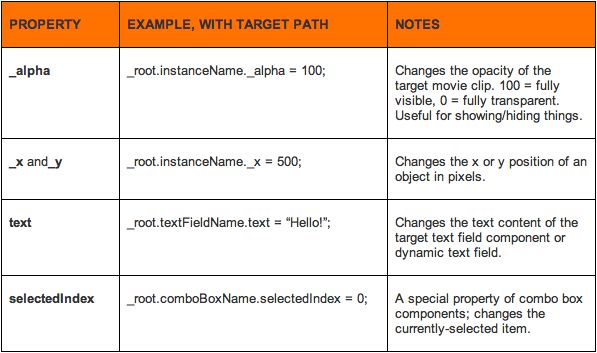
- You can also change properties of an object using ActionScript. Properties of an object are special keywords that Flash recognizes. You can evaluate or change properties of an object using ActionScript. Components, movie clips and other types of objects all have unique properties. You can look up a particular object type’s properties and their possible values in Flash’s documentation. You can use the “equals” sign to change a property of an object. For example, to change the text of a text box called “welcomeMessage” you might write:
welcomeMessage.text = "Hello!"
Some useful properties include:
Flash workshop at UX Week
Alexa will be leading a workshop on Flash Prototyping (
http://www.uxweek.com/workshops/prototyping-with-flash) at UX Week (August 12- 15, 2008) in San Francisco. This workshop offers the impetus, skills and inspiration you need to get started with Flash prototyping. Come and learn how to bring your wireframes to life!
Use discount code FOAA for 15% off.


Excellent tutorial Alexa. Your instructions were easy to follow and you provided heaps of valuable background info. I can really see the benefits of this approach. Great work!
Great collection of Stuff here. I have recently had to pick up AS3 as part of a Product design project. I found that flash is great for conveing the core concpet, even if it is all smokes and mirror. I also found that a good search of the forums means you can find code snippets for just about everything. Another advantage for myself was the abilty to use a range of sensors to create a new and novel concpet. You can see my concept at http://jive.benarent.co.uk and can see my code at http://www.benarent.co.uk/bog/design/how-to-create-a-magnetic-tangible-user-interface/
Thanks for the tutorial, Alexa. I was impressed with how detailed it was, plus how you made sure to reiterate the value and context of it throughout. (Wait, that sounds like…design!)
What strikes me about these prototypes is their potential for generating a greater frequency of cross-cultural “a-ha!s” for both designers and users. Since the IXD’s role is to understand and then design for the different world of the users, the prototype is a good way to communicate the designers’ understanding (or identify a misunderstanding) of what the users need/expect. Particularly when the designers come from a demographic, nation, class, or language group which differs from the client. And profoundly when the user group may not yet fully understand the role or utility of the technology (e.g. when mobile tools were introduced to clinicians in hospital wards).
Conversely, designers have a chance to observe all the culturally-based subtleties of how the users interact with the technology. By observing the other-culture user experience, designers can identify trouble-spots that they never would have anticipated. Or they might find the test subjects use a feature in unanticipated but positive ways.
Yeah, I’ve just described the basic idea of usability testing, but I’m thinking here about the cultural dynamics. A deep understanding by both parties would not necessarily occur with lower fidelity prototypes because many cultural elements of the onscreen ecosystem (which impact interaction) are not present. The fact that a designer can make these robust prototypes quickly and change them efficiently means that cross-cultural epiphanies might occur more.
This is an excellent article. Far too many resources on Flash are way over my head, but this is just what I’ve wanted to kick-start my Flash usage (until Thermo arrives of course, then we’ll all be using that I would expect).
Nice tutorial – I think that in many cases a visual representation of a final design is much more useful than a set of functional specifications.
That said, I would advise caution when using this method, mainly clients – particularly where agencies tend to get carried away, in my experience, is with some of the additional presentation features which are possible in Flash. A cool pre-loader, swirly fade in-animation may be fantastic when it comes to impressing people when pitching a design, but really just sets everyone up to fail with unrealistic expections.
Be careful not to get carried away making something which is poor usability (but looks cool), or which is itself a pain to implement with vanilla HTML.
I have often thought that OpenLaszlo would make an excellent alternative to Flash as a prototyping tool, without having to (a) shell out any cash or (b) having to learn ActionScript. In fact, I am in the process of playing around with it now.
But I have not seen any resources online that talk about using it for prototyping.
Has anyone here tried it or considered it? What were your experiences/conclusions?
Martin: I think a lot of the utility of OpenLaszlo for prototyping would stand or fall on the quality for the IDE you use to create the prototype. As far as I can tell, IDEs that support OpenLaszlo are rather few in number, and (eg Spket IDE) are aimed at developers building real apps rather than people like us who want to knock out concepts for demonstration purposes in short periods of time. That issue goes to the heart of what a prototyping tool is about. That said, it would be interesting to give OpenLazlo a try.
@Jonathan: Thanks for mentioning Spket. I was not aware of it. Looks interesting.
As I see it, the upside of using OpenLaszlo (or Flash, or XHTML+CSS+jQuery, or whatever) is that it allows you to simulate things that you just can’t do in a static, annotated wireframe. And also that you can play around with the interactions and make sure you have covered all the possible flows and ensure they make sense (e.g., what happens if the user cancels here? does it make sense to disable this control when the user makes a selection in a different control? etc.).
The downsides are that (a) it is not visual in the way that Photoshop or Visio are, and (b) it takes quite a lot of time and effort to create a prototype this way.
So the way I see it, if you choose to go down this route (whether it’s Flash, Laszlo, XHTML+whatever), you need to know when it’s necessary and when you can get away with something static. That is, the level of complexity determines whether you go with static or whether you go with dynamic.
Am I on the right track here?
I don’t get why you’d go to all this trouble to prototype in anything other than HTML+CSS (with the help of a good JavaScript library like Dojo or Scriptaculous). I guess if you know Flash and NOT JavaScript it might make sense because it’s a tool you know better. But otherwise, why not prototype and get a good chunk of the actual work done at the same time? If you prototype in the medium that the app is ultimately going to use, then you just have to integrate the real backend with your prototypes and refine things some more in the process and presto, you’ve eliminated tons of redundant/unnecessary work.
Oh, and if you’re writing standards-complaint (X)HTML from get-go, you’re going to save a good bit of time when it comes to browser testing and accessibility too.
Hi Isaac!
HTML prototyping can definitely make sense, especially if you’re good enough at XHTML and close enough to the engineers (and final product) to write code that would actually be useful to them. Julie Stanford wrote a great article about HTML prototyping for those who are interested:
http://www.boxesandarrows.com/view/html_wireframes_and_prototypes_all_gain_and_no_pain
But a lot of the work we do as interaction designers is not quite at that point (and many of us aren’t good enough coders for coding to be time well spent) — we just need a way to communicate an idea quickly and efficiently. Hiring a prototyper is an option, of course — but that introduces other communication challenges and requires time and resources that aren’t always available.
If we’re already creating wireframes, being able to hook up these graphics and make them feel interactive can be a much better use of time than trying to do front-end coding, especially early in concepting. As some of you mentioned, there are some more targeted prototyping tools than Flash on the horizon or already out for doing this. I know some of these tools even promise to generate code as you visually prototype… but I’ll be curious to see how that sort of code-generation fits into designers’ and developers’ real workflows.
Thanks for all the comments so far everyone!
Alexa
Great article, Alexa. At my previous job I used this method for the same purpose as well. I went this route because I a) lacked the knowledge to get it to work with real code, b) we didn’t have a full type prototyper, and c) it was much faster and didn’t require dev resources — granted I knew the basics of Flash so the transition was easier. At my current job we have a full time prototyper, but I still find this method great for quick studies that require the demonstration of interactions.
Nice article! but I find huge the need to learn how to program with Flash to do prototyping,
on top of that there is the need to purchase the software and of course keep it updated.
There is a nice little app called Oversite, which does a great job for prototyping, it does not
look as nice as a Flash one, but all the real needs of wireframing, link connections, link testing,
flow testing, etc. are present… it is, I think, a real secret treasure…
Great job Alexa. I’m fairly new to ActionScripts but you made it very easy to follow. Thank you so much. I was wondering if you could explain how you did the other steps where you select friends, schools, etc. I really like the drop down functionality. Any chance you could point me in the right direction to learn more on how you did that?
Thanks again for the great tutorial. I do hope to hear back from you.
Cheers,
Eddie
Did you take a look at Axure? It is designed for interaction designers to create prototypes. Learning actionscript and such seems rather inefficient.
Hi Eddie!
I guess I forgot to mention that there’s a Part II yet to come! Part II covers all of the steps for completing the rest of the tutorial. I’d be happy to send you the rest, just email me at: alexa at adaptivepath.com
Alexa
Hi Alexa
Outstanding. Thanks again for your help. I’ll email you in a few minutes. I really appreciate the help.
Julius – Thanks for the advise. That software looks pretty good too. I think having knowledge in several areas including action scripts doesn’t hurt. The more you know the more valuable you are to a company.
Thanks again,
Eddie
Hi,
This is great. Thanks for putting this together. I will certainly try this method. Every prototype I’ve done so far (mainly HTML) have taken up way too much time. Maybe method can make the difference!
Quick question. Do you find that clients get “stuck” on the “fineshed” nature of a prototype? One thing that I really like about wireframes is that clients “accept” the nature of the nature of what wireframes are for. The more finished my wireframes are, the more “design” expectations they begin to have. And that’s not as important early on in the project.
Thanks,
az
Hi Andres,
Just like wireframes, prototypes can have varying levels of fidelity, and choosing the level of fidelity for either is always a tricky question. It’s a balancing act: On one hand, clients can’t always understand or appreciate the concepts when they’re too rough, but on the other, if they feel too finished, clients will get attached to or critical of the details.
The good news is, this prototyping method works for any level of fidelity that works for wireframes. You can give your wireframes a sketchy or wirey look and feel during early stages (even using a “pencil drawing” effect or using scanned sketches as the artwork), and in later stages, you can use fully-featured visual comps in your prototypes. The perceptions of finished-ness, I think, are generally shaped more by the artwork than the interactivity.
Happy prototyping!
Alexa
Hi,
Great article Alexa. I just completed the tutorial and I will start my own examples in a moment. Just I want to let you know I noticed a typo mistake but because it is inside the code is worth correcting it, in case someone gets confused in the future while trying to follow your tutorial without previous knowledge in ActionScript.
On section 9.6 ->
9.6. The complete script that will be placed on the button, which includes the actions that should happen when the condition is met or not met, is:
on(release) {
if(_root.termsBox.selected true) {
_root.gotoAndStop(“W07”);
}
else {
_root.gotoAndStop(“W06”);
}
}
in the second line of code the symbol “==” is missing between “selected” and “true”.
Thanks again for the great article, looking forward for part II.
Marianna
Thanks Alexa! Today I understand my Flash !
We have translated a small part.
http://blog.libero.it/eGanz/5069079.html
See you soon in the Dolomites ! ( http://www.dolomitipark.it/Eindex.php )
Dario and Marco Ganz.
Thank you so much for such an interesting post!
The factors that are determinant in a website’s http://www.alexa.com/data/details/main?url=www.fortunehotels.in Alexa rankings apart from the data collected from the users of the Alexa toolbar are no where clearly mentioned. This somehow brings in a question of doubt and credibility issues as far as the Alexa rankings are concerned. However, even today the Alexa toolbar has the largest chunk in determining the ranking of a website.
Looking for Part 2?
I’m sorry I never published Part 2 on Boxes and Arrows, but here’s a workshop workbook that I created that walks you through both parts, complete with visuals. It’s still based on ActionScript 2.0, but should be useful still for doing simple prototypes!
http://www.slideshare.net/ladylexy/flash-prototyping-workbook-part-1-and-2-3534139
BTW, you can also export flash straight from InDesign starting in CS4! Pretty fantastic.