Few information architects tap the full power of Visio. For the IA, Visio is a means to an end—a mechanism for capturing some ideas on paper before they are transformed into graphics, HTML, and code. Even so, the information architecture community can take advantage of some of Visio’s advanced features to make developing documentation more efficient.
This article introduces several techniques in the context of wireframe annotations. At the conclusion, you will have learned to create an annotation widget, and you will also have learned several facets of Visio you may not have been aware of.
The widget consists of two parts: the annotation shape, which points out the feature of the wireframe; and the footnote shape, which contains the reference for the annotation.
Creating the annotation widget requires three steps:
- Creating the annotation shape and the footnote shape
- Establishing a relationship between the annotation and the footnote
- Changing the behavior of the annotation
Step 1: Creating the annotation shape and the footnote shape
In this step, you create two shapes, one a basic circle for the footnote and one a circle with a pointer for the annotation. Although we use basic shapes, we use some advanced shape operations techniques.
- Draw a circle that’s .25” in diameter and make a copy. One circle will be the annotation shape and one will be the footnote shape.
- Draw a square that’s .25” on a side and rotate it 45 degrees. (You can do this by opening the Size & Position Window from the View menu. Select the square and type 45 into the Angle field.)
- Position the square directly over the circle that will be the footnote shape. Make sure both the circle and the square are selected. Choose Fragment from the Shape > Operations menu. This operation breaks up the two shapes into component pieces.

- Delete three of the square’s corners. Select the circle and the fourth corner and choose Combine from the Shape > Operations menu.

You’re done with step 1. Now you should have two shapes on the page: a plain circle and a circle with a pointer on it.
Step 2: Establishing a relationship between the annotation and the footnote
In this step, you’ll teach your footnote shape to mimic whatever text you type in the annotation shape. This way, if you renumber your annotations, the footnotes will automatically renumber. This step introduces a few techniques: naming shapes, inserting fields, using Visio formulas, and using Visio shape references in formulas.
- To establish a relationship between these two shapes, you need to name them. Naming shapes is easy enough. Select the shape and then choose Special… from the Format menu. (How the name of a shape relates to Format Special is beyond me, but the nuances of Visio are for another discussion.) The Special dialog box includes a field for a name. Type a name for each of your shapes. Name the footnote shape “footnote” and the annotation shape “annotation.” This way, there can be no confusion.
- Now, select the footnote shape and choose Field… from the Insert menu. The Field Chooser appears.
- Click Custom Formula in the left-hand column. The Custom Formula field at the bottom of the dialog will become active. The field already has an equal sign, which lets Visio know that a formula is coming up.
- AFTER the equal sign, enter the following formula:
SHAPETEXT(annotation!TheText)

- Click OK.
The SHAPETEXT function returns the text of the referenced shape. In the function’s arguments, we have specified the name of the shape (“annotation”) and the reference to the shape’s text property (“!TheText”). This seems redundant, but the SHAPETEXT function requires it.
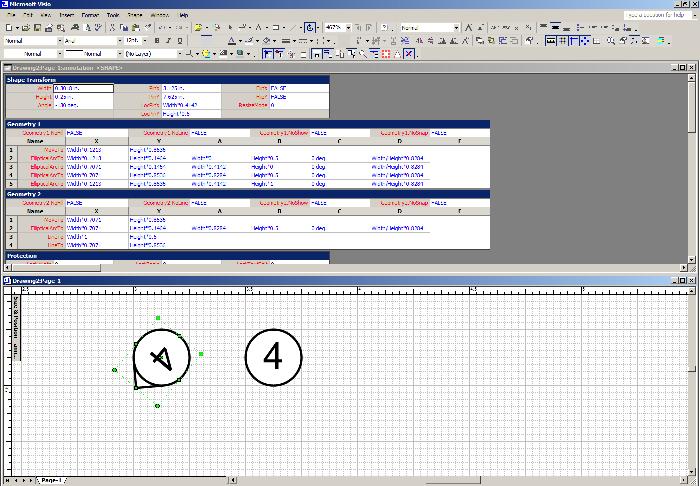
You’re done with Step 2. Now you can type a number into the annotation shape and it will appear in the footnote shape as well. For example, select the annotation shape and type “4”. The “4” will appear in both shapes. Be sure you type the number into the annotation shape (the one with the pointer). If you type it into the footnote shape, you will lose the Custom Formula reference and will have to re-enter it.
| What is a ShapeSheet? Remember in the first Matrix movie, at the very end when Neo started knowing he was The One? He looked around saw streams of numbers, the building blocks of the Matrix – at once a terrifying and awe-inspiring view of the world. A ShapeSheet is to a Visio drawing as Neo’s view is to the Matrix: the numbers behind the façade. (Coincidently, I’m terrified and awestruck by Visio.) Any given shape in Visio is described by a collection of formulas. These formulas are captured on the ShapeSheet. When you adjust a shape – change its height or format the text, for example – you are actually changing the formulas behind the scenes. In some cases, it makes more sense to adjust the formulas themselves, and tapping the full extent of Visio’s power means becoming familiar with ShapeSheets. |
Step 3: Changing the behavior of the annotation
The shapes as they stand right now are pretty useful, and will make the internal bookkeeping of wireframe annotations a little easier. This last step will make the annotation shape more elegant. This step introduces several techniques related to ShapeSheets, the backbone of any Visio drawing.
There are three adjustments you need to make to the annotation shape: the text block, the shape rotation, and the orientation of the text.
To adjust the text box, select the shape and then choose the Text Block Tool. You may have to click the arrow next to the text tool to find the Text Block Tool. The Text Block Tool allows you to change where text appears relative to the shape. By default, the text block occupies the entire rectangle of the shape.

With the shape selected with the Text Block Tool, change the shape of the text box to occupy only the circle, dragging the right-hand handle of the rectangle to form a square over the circle. Now when you type text in the annotation shape, it will appear centered on the circle.

To adjust the rotation, select the shape and then choose the Rotation Tool. Notice that the center point is not centered on the circle. This is because the default formula for the rotation point is the geometric center of the entire shape. Move the pointer over the center rotation point. The pointer will change to a small circle.
Click and drag the rotation point to the center of the circle.
Now test the rotation by grabbing one of the rotation handles (the green circles at the corners). The shape will rotate around the center of the circle.
Notice that the text rotates with the shape. By default, the rotation of the text block matches the rotation of the shape. To correct the orientation of the text, we need to adjust the angle of the text block, forcing it to stay absolutely zero regardless of the shape’s rotation.
To adjust the text orientation, you need to make a change in the ShapeSheet. First, select the annotation shape and then choose Show ShapeSheet from the Window menu. The screen will split, with one part showing the original drawing and the other part displaying the ShapeSheet of the annotation shape. A ShapeSheet is made up of sections. Each section addresses a different aspect of the shape and appears as a table made up of cells.
The cell that controls the rotation of the text is in the Text Transform section. Scroll through the ShapeSheet until you find this section. If you cannot find the section, you may need to add it to the ShapeSheet: right-click in the ShapeSheet and select Insert Sections… from the context menu. Be sure to right-click in the dark gray area. Put a check next to Text Transform and click OK. (If Text Transform is grayed, that means it’s already in the ShapeSheet and you just need to have your eyes checked. This happens to me frequently. Very frequently.)
In the Text Transform section is a cell called TxtAngle. At this point it is set to 0 degrees. This may seem right, but that number is not an absolute measurement. Instead, it is measured relative to the angle of the overall shape. Therefore, the appropriate formula for this cell is:
-Angle

(Don’t forget the minus sign!) Angle is the name of another cell, the cell that defines the angle of the overall shape. Because the TxtAngle cell acts relatively to the angle of the shape, putting a negative value equal to the angle will permanently render it absolutely zero.
You can now close the ShapeSheet and rotate the annotation till the cows come home. The text will remain upright and readable. The cows, I’m afraid, may not.
| Exercise for the reader You may want to lock the text of the footnote shape so you don’t accidentally overwrite the field that automatically matches the annotation text. Although Visio has a dialog box for protecting different aspects of a shape (under Format > Protection…), the shape text is not one of those aspects. There is a way to do this using ShapeSheets. |
This little exercise gives you a handy tool that allows you to place annotations without losing track of your numbering scheme. The tool also allows you to rotate the annotation pointer without having to adjust the text every time you turn it. Having built this tool, you now have some experience with Visio shape operations, formulas, and ShapeSheets.
![]()
Holly, I’m sorry you found the article confusing. I did test the method several times, but I recognize that I could not go into great detail on some of the steps.
Here’s a quick glossary to help you through it:
Annotation Widget: the entire finished product
Annotation Shape: the part of the widget that is used for pointing to different parts of the wireframe
Footnote Shape: the part of the widget that is used in the sidebar to refer to the annotation
Annotation Circle: the part of the annotation shape that is, well, a circle
I hope this helps. Do not hesistate to email me directly if you need further assistance!
What about having a text area next to the footnote? You know for the footnote itself.
Thanks for this article!
I’m not sure if DonnaM had this same situation and solution, but I couldn’t get the SHAPETEXT formula to work using the “annotation” name. ( the formula SHAPETEXT with field “annotation!TheText” returned a “bad shapesheet name.”)
I therefore had to use the name that was automatically given to the shape and reference that in the formula. I my case i used the field “Sheet.53!TheText”.
Also, the .25 diameter of the circle is small if you use 8 pt font and go into double digits, so users may want to increase the diameter from the beginning.
Another way to document a wire frame can be found here:
http://www.interakt.nu/home/visio/
I’m using Visio 2007, so this may be different, but to name the shape properly I just navigated to the Shapes in the Drawing Explorer, found my shape (Shape.35 or what have you) clicked on it twice to rename like you would a file, and typed in “annotation”.
Thank you very much for this Dan – it is very useful.
For users of Visio 2007: You may find that ‘Step 2’, ‘Section 1’ above is only relevant to version 2003 of Visio. If you cannot locate the ‘Special…’ menu item within the ‘Format’ menu then try this:
1) Click the ‘Tools’ menu
2) Click the ‘Option’ item and then the ‘Advanced’ tab
3) Then check ‘Run in developer mode’ and click ‘OK’
Now you should see the ‘Special…’ menu item within the ‘Format’ menu.
Hope this helps.
Regards,
Anthony.
Dan, thanks for the continue series of tuitorials. This one was especially helpful. It saved me time on a large doc I was working on this evening. Cheers.
This article was a bit hard to follow–there were several naming discrepencies, ie. which one is the annotation circle, footnote. Might want to test these instructions.
Another idea on creating your annotating pointer without the shapesheet, formula, and custom properties that leave my IA colleagues glossy eyed:
* Create square
* Create circle (circle radius = square side length)
* Orient circle on square, select both, then Group them
* Create text object (and format it…)
* Orient text object on top of circle/square, select all, then Group again (thus, giving you a two level hierarchy of groups)
* Click into group (twice) until you highlight only circle/square subgroup
* Use rotate handle (Visio 2003) or rotate tool (earlier Visio) to rotate just the circle/square subgroup, leaving text rotation untouched
This article is great for me – I recently began using Visio for Fish Bones and Call Flows and wasn’t aware of such advanced features. Please let me know of any other exciting features….. Meanwhile I am definitely going to explore many more on my own!!
So..
A) How do you “lock” the text so that it is still updating when changes are made (it’s not obvious and the documentation is scarce).
B) What’s the method that will work to save these two joined shapes in a Stencil for re-use??
thanks.
Hey Dan, good article.
Like john, I too have been playing this this widget looking for a way to save it as a stencil for re-use while keeping the name and formulas all working properly. If you have any suggestions – let us know.
🙂
I don’t want to begin a Mac/PC war with this comment, but those using Visio haven’t discovered the greatest IA application on the market: OmniGraffle.
http://www.omnigroup.com/applications/omnigraffle/pro/
I use it extensively for everything IA, including Blueprints and WireFrames.
Having come from an architecture background I’ve referred to construction documents as a way of communicating rough ideas and even finished development specs.
Another technique is to use annotations (or call-outs) to point to another visio page that provides more detail on the subject area. (similar to archictectural details)
In my opinion (albeit biased, 🙂 ), construction documents are a great resource for discovering effective techniques for communicating complex information.
Having said that, it’s easy to forget that the tool should never dictate the need.
Good stuff.
Tim
Good article, Dan!
re: locking text
1) select the Foonote shape you’ve created
2) Windows -> Show ShapeSheet
3) in the Footnote ShapeSheet:
– Protection section -> “LockTextEdit”
– change value from 0 to 1
That’s it! Should now be unable to change the text in the Footnote shape.
re: saving into stencil
1) Open up your favorite custom stencil (or create a new one with File -> Shapes -> New Stencil)
2) Select both the Annotation and Footnote shape
3) Drag both of the shapes together into the Stencil
4) Save the stencil
Now, when you drop the new Annotation/Footnote shape onto a drawing, you’ll need to Ungroup it first to separate the two elements.
I haven’t figured out a way to let you drop it in as two separate shapes, rather than as a single grouped shape.
The stencil stuff is a little involved, which is why I left it out of this tutorial altogether. Xavier’s trick will work just fine, but he’s right about the grouping issue. Demand seems high enough to warrant a column on the subject. I’ve got a couple other tutorials I’m working on, but that will be next on my agenda…
Great series of articles on Visio. Unlike the Matrix, apparently we can be told what Visio is. 😉 I too would like to see an article on creating custom stencils!
In response to Mark about OmniGraffle, I wear a lot of hats including Information Architect, Database Architect, and Software Developer. I have to develop on Windows to meet my customer’s needs. Though Visio may not be the ideal tool for IA, it’s the best thing we have on Windows and it’s a good all-around workhorse that serves me well in many respects (UML, ER, and dataflow diagrams come to mind).
I have had troubles with the shapetext formula in Visio 2003 – don’t know why, I just get a ‘bad shapesheet name’.
To get around this, rather than naming and targeting the shape by name, find the shape ID (Format>Special, look for ID at the top), then use this formula:
== =SHAPETEXT(sheet.ID!TheText) ==